リニアレイアウト (LinearLayout) の子の部品の配置 (重み付け)
リニアレイアウトでは、スペースに対して子の部品をどのように配置するかを設定することができます。(余分なスペースをどのように埋めるかを設定できます)
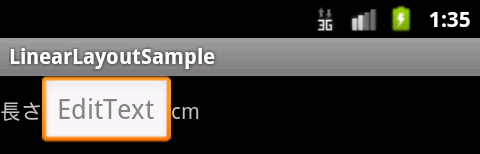
例えば、以下のレイアウトを例にして考えます。
リソースの定義 (xml ファイル) は、以下のように記述しています。
<LinearLayout
    android:layout_width="match_parent"
    android:layout_height="wrap_content"
    android:orientation="horizontal" >

    <TextView
        android:layout_width="wrap_content"
        android:layout_height="wrap_content"
        android:text="長さ"/>

    <EditText
        android:layout_width="wrap_content"
        android:layout_height="wrap_content"
        android:hint="EditText"/>

    <TextView
        android:layout_width="wrap_content"
        android:layout_height="wrap_content"
        android:text="cm"/>
</LinearLayout>
ここで、以下のように EditText を広げて横の余ったスペースを埋めるとします。

余ったスペースを埋めるために、EditText に layout_weight 属性を追加し、1 を指定します。
ソースは以下のようになります。
<LinearLayout
    android:layout_width="match_parent"
    android:layout_height="wrap_content"
    android:orientation="horizontal" >

    <TextView
        android:layout_width="wrap_content"
        android:layout_height="wrap_content"
        android:text="長さ"/>

    <EditText
        android:layout_width="wrap_content"
        android:layout_height="wrap_content"
        android:layout_weight="1"
        android:hint="EditText"/>

    <TextView
        android:layout_width="wrap_content"
        android:layout_height="wrap_content"
        android:text="cm"/>
</LinearLayout>
layout_weight="1" とすることで、その部品で余ったスペースを埋めることができます。
この属性が指定されている部品で余ったスペースを埋めることになりますが、複数個の部品に対して layout_weight 属性が設定されている場合は、余ったスペースをそれらの部品で分け合います。(ひとつの部品にしか指定されいない場合は、その部品で余ったスペースを埋めます。)
詳しくは、下の例を参考にしてください。
例1:余ったスペースを均等に分ける
2 つのボタンで余ったスペースを均等に分けます。

この時は、両方のボタンに layout_weight="1" を指定します。
<LinearLayout
    android:layout_width="match_parent"
    android:layout_height="wrap_content"
    android:orientation="horizontal" >

    <Button
        android:id="@+id/btn1"
        android:layout_width="wrap_content"
        android:layout_height="wrap_content"
        android:layout_weight="1"
        android:text="Button 1"/>
    <Button
        android:id="@+id/btn2"
        android:layout_width="wrap_content"
        android:layout_height="wrap_content"
        android:layout_weight="1"
        android:text="Button 2"/>
</LinearLayout>
例1:余ったスペースを 1:1:2 で分ける
3 つのボタンで余ったスペースを 1:1:2 で分けます。

この時は、2つのボタンに layout_weight="1" を 最後のひとつには ="2" を指定します。
<LinearLayout
    android:layout_width="match_parent"
    android:layout_height="wrap_content"
    android:orientation="horizontal" >

    <Button
        android:id="@+id/btn1"
        android:layout_width="wrap_content"
        android:layout_height="wrap_content"
        android:layout_weight="1"
        android:text="Btn 1"/>
    <Button
        android:id="@+id/btn2"
        android:layout_width="wrap_content"
        android:layout_height="wrap_content"
        android:layout_weight="1"
        android:text="Btn 2"/>
    <Button
        android:id="@+id/btn3"
        android:layout_width="wrap_content"
        android:layout_height="wrap_content"
        android:layout_weight="2"
        android:text="Btn 3"/>
</LinearLayout>
リニアレイアウト (LinearLayout) 関連の説明
⇒ リニアレイアウトの使い方
⇒ 入れ子にする
⇒ スクロールバーを付ける