3.4. 画面作成 xml 編
画面作成 GUI 編 では、グラフィカルに画面を作成していく方法について説明しましたが、ここではxmlで直接記述していく画面作成の方法について説明していきます。
対象のファイルについて
記述していくファイルはプロジェクト作成時に既に自動生成されています。パッケージエクスプローラの[SplitTheCost] - [res] - [layout] の中にある [main.xml] ファイルです。
これをダブルクリックで開き、[main.xml] タブを選択します。
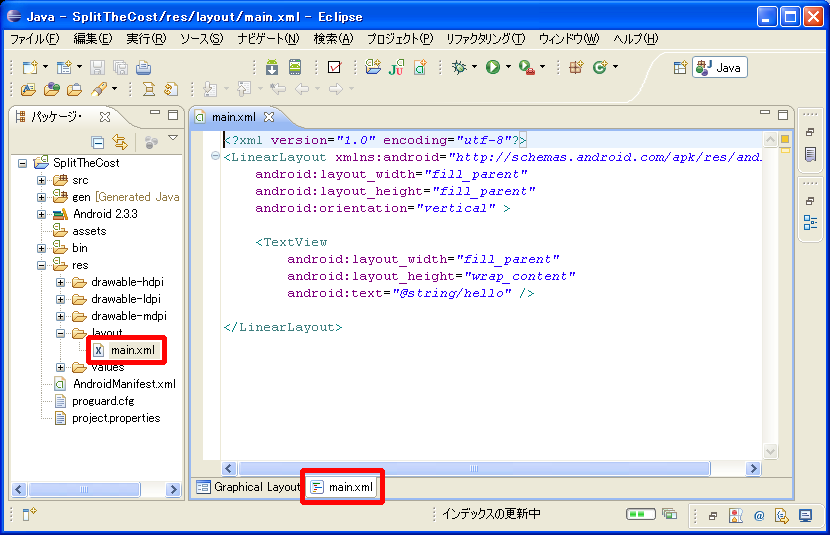
ここに画面の定義を記述していきます。
既に 「LinearLayout」と「TextView」 が記述されていますが、これはプロジェクトを作成したときに自動的に生成されるコードで、画面に "Hello World, SplitTheCostActivity!" と表示されるようになっています。
ソース内の < TextView ~ /> がこれに該当する部分です。
画面作成
[割り勘計算機] アプリの画面を作成していきます。
ますは自動で生成された不要なコードを削除します。ソース内の < TextView ~ /> がこれに該当する部分です。
画面については、 画面作成の考え方 で配置を考えましたが、その通りに記述していきます。
最初から記述されている LinearLayout が縦一列に並べるレイアウト用の部品です。
縦に並べるか横に並べるかは、android:orientation 属性で指定でき、縦に並べる場合は vertical、横に並べる場合は horizontal を設定します。
既に記述されている LinearLayout は vertical の設定なので、縦に並べるレイアウトになります。
では 「人数」 「入力部」 「人」 の部分のコードを記述していきます。
この部分は横に並べるので、横に並べるレイアウトを配置してその上に[人数]等の表示部品を配置するようにソースを記述していきます。人数・人のテキストは TextView、入力部は EditText を使用します。
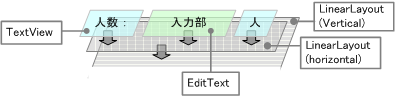
xml の記述では、LinearLayout タグの中に TextView と EditText タグを入れ子にすることでこのような配置にすることができます。
ここまでの画面を作成するために、xml ファイルに以下のように記述します。
<?xml version="1.0" encoding="utf-8"?>
<LinearLayout
    xmlns:android="http://schemas.android.com/apk/res/android"
    android:layout_width="fill_parent"
    android:layout_height="fill_parent"
    android:orientation="vertical" >

    <LinearLayout
        android:layout_width="match_parent"
        android:layout_height="wrap_content"
        android:orientation="horizontal" >
        <TextView
            android:layout_width="wrap_content"
            android:layout_height="wrap_content"
            android:textSize="20sp"
            android:text="@string/numPeople" />
        <EditText
            android:id="@+id/etxtNum"
            android:layout_width="0dp"
            android:layout_height="wrap_content"
            android:layout_weight="1"
            android:inputType="number" />
        <TextView
            android:layout_width="wrap_content"
            android:layout_height="wrap_content"
            android:textSize="20sp"
            android:text="@string/people" />
    </LinearLayout>
</LinearLayout>
各属性は以下のような意味です。
| 属性 | 設定 | 説明 |
|---|---|---|
| layout_width layout_height | match_parent | 幅を親の部品の幅いっぱいに広げる |
| wrap_content | 幅を部品の内容(テキスト等)に合わせる | |
| id | @+id/xxxx | プログラムからアクセスするための id を設定する |
| layout_weight | 数値 | レイアウトの重みを設定。LinearLayout 内で EditText にだけ指定した場合、「人数」「人」の領域を除いた領域がすべて EditText の領域となる。 |
| orientation | vertical | 縦一列に並べる |
| horizontal | 横一列に並べる | |
| text | @string/xxxx | 表示文字を設定する。文字の定義は string.xml ファイルに記述し、定義した id をここで設定する |
| textSize | xxsp | 文字の大きさを設定する。設定できる単位はいろいろあるが sp が解像度による崩れが少ない。(推奨) |
| inputType | number | 数字入力にする。 他に文字入力の "text"、パスワード入力の "textPassword" など... |
layout_width, layout_height はほとんどのタグに共通の属性で、各部品の幅と高さを設定します。id も共通の属性で、プログラムからアクセスする場合に必要となります。(プログラムから id をキーとして部品のオブジェクトを取得する。)
orientation text inputType は、それぞれのタグ専用の属性です。
text属性に指定する "@string/xxxx" ですが、これは 「文字列として定義した xxxx を使用する」 という意味になります。Android アプリでは文字列等のリソースを "string.xml"ファイルに定義してそれを使用します。(リソースをまとめて管理するため)
まだこれらの文字を定義していないので、string.xml に使用する文字を定義します。
string.xml ファイルは、パッケージエクスプローラの values フォルダにあります。
このファイルに以下の記述を追加します。
<string name="numPeople">人数 :</string>
<string name="people">人</string>
これで、「人数 : 」を "numPeople"、「人」を "people" という名称で定義したことになります。
同じようにして、金額の行も以下のように記述します。
<LinearLayout
    android:layout_width="match_parent"
    android:layout_height="wrap_content"
    android:orientation="horizontal" >
    <TextView
        android:layout_width="wrap_content"
        android:layout_height="wrap_content"
        android:text="@string/money"
        android:textSize="20sp" />
    <EditText
        android:id="@+id/etxtMoney"
        android:layout_width="0dp"
        android:layout_height="wrap_content"
        android:layout_weight="1"
        android:inputType="number" />
    <TextView
        android:layout_width="wrap_content"
        android:layout_height="wrap_content"
        android:text="@string/yen"
        android:textSize="20sp" />
</LinearLayout>
また、string.xmlに「金額」「円」を定義するため、以下の記述を追加します。
<string name="money">金額 :</string>
<string name="yen">円</string>
同じ要領で画面全部を記述していきます。なおボタンには "Button" を使用します。
完成した main.xml と string.xml は以下のようになります。
main.xml
<?xml version="1.0" encoding="utf-8"?>
<LinearLayout
    xmlns:android="http://schemas.android.com/apk/res/android"
    android:layout_width="fill_parent"
    android:layout_height="fill_parent"
    android:orientation="vertical" >

    <!-- 人数の入力行 -->
    <LinearLayout
        android:layout_width="match_parent"
        android:layout_height="wrap_content"
        android:orientation="horizontal" >
        <TextView
            android:layout_width="wrap_content"
            android:layout_height="wrap_content"
            android:text="@string/numPeople"
            android:textSize="20sp" />
        <EditText
            android:id="@+id/etxtNum"
            android:layout_width="0dp"
            android:layout_height="wrap_content"
            android:layout_weight="1"
            android:inputType="number" />
        <TextView
            android:layout_width="wrap_content"
            android:layout_height="wrap_content"
            android:text="@string/people"
            android:textSize="20sp" />
    </LinearLayout>

    <!-- 金額の入力行 -->
    <LinearLayout
        android:layout_width="match_parent"
        android:layout_height="wrap_content"
        android:orientation="horizontal" >
        <TextView
            android:layout_width="wrap_content"
            android:layout_height="wrap_content"
            android:text="@string/money"
            android:textSize="20sp" />
        <EditText
            android:id="@+id/etxtMoney"
            android:layout_width="0dp"
            android:layout_height="wrap_content"
            android:layout_weight="1"
            android:inputType="number" />
        <TextView
            android:layout_width="wrap_content"
            android:layout_height="wrap_content"
            android:text="@string/yen"
            android:textSize="20sp" />
    </LinearLayout>

    <Button
        android:id="@+id/btnCalc"
        android:layout_width="150dp"
        android:layout_height="wrap_content"
        android:text="@string/calc" />

    <TextView
        android:layout_width="wrap_content"
        android:layout_height="wrap_content"
        android:text="@string/oneMoney"
        android:textSize="20sp" />

    <!-- 結果の金額表示行 -->
    <LinearLayout
        android:layout_width="match_parent"
        android:layout_height="wrap_content"
        android:orientation="horizontal">
        <TextView
            android:layout_width="wrap_content"
            android:layout_height="wrap_content"
            android:text="@string/result"
            android:textSize="50sp"/>
        <TextView
            android:layout_width="wrap_content"
            android:layout_height="wrap_content"
            android:text="@string/yen"
            android:textSize="20sp"/>
    </LinearLayout>
</LinearLayout>
string.xml
<?xml version="1.0" encoding="utf-8"?>
<resources>
    <string name="app_name">SplitTheCost</string>
    <string name="numPeople">人数 :</string>
    <string name="people">人</string>
    <string name="money">金額 :</string>
    <string name="yen">円</string>
    <string name="calc">計算</string>
    <string name="oneMoney">一人当たりの金額</string>
    <string name="result">xxxxx</string>
</resources>
これでxmlの記述は終了しました。
できた画面を確認するために、main.xmlファイルを [Graphical Layout] タブを選択して表示してみます。すると下のように表示されるはずです。

これで画面作成は終わりです。
「計算」 ボタンを押したときの処理の実装について説明します。
⇒ 3.5. 処理の実装